January 25, 2012
Water Logged
If you don’t already know, due to my broken tailbone, I have been forced to take six weeks off biking and running, but I can swim as long as I don’t kick. After 10 days of my forced downtime, I’m now water logged and sick of swimming. On the upside, I think I’m getting some muscles in my arms. Only 32 days to go and hopefully my tailbone will be ready for Ironman training. You can see my plight in the video below.
January 16, 2012
The Moral Of The Story
I think someone might be sending me a message. This reminds me of that joke about the guy sitting on top of is flooding house and while a boat, a plane and a helicopter try to rescue him, but he refuses to take the help because he says god will rescue him. Then after he drowns, he is in heaven and asks god, “why didn’t you save me” and god answers “I sent a boat and plane and a helicopter, what else did you want me to do”.
My story is this, I broke my tailbone in mid-October, I took a week off training, and then moved to a modified training schedule, still competing in all the races I had already registered for. Well, the tailbone pain just kept getting worse instead of better. I know that my doctor said to take it easy, but I think his idea of easy was not my idea of easy. So when late December rolled around, I decided it was time to come off the easy training plan and back on to the normal training plan. Get this, my tailbone started hurting even more, I just couldn’t figure out why it was hurting so bad. So after another visit to the doctor, he said that he wanted me to take 6 weeks off of running and biking. So if you know me, you know I took this very badly.
Ok, so I saw the doctor on Friday, and the way my mind works, I figured I would give this taking time off thing some good thought before committing to it. That means I would go ahead and ride on the snowy trails on Saturday and run the Castlewood trails on Sunday, then on Monday I would start my 6 weeks off, well maybe.
So 45 minutes into our run on Sunday, I’m running along telling Chuck about a movie I watched that I knew he would hate and the next thing I know I’m on the ground, rolling around, chanting in my head, “it doesn’t hurt that bad, don’t cry, don’t cry”. Chuck runs over to me and says please tell me you didn’t land on your butt. I of course replied, “no butt is fine, but everything else hurts”. Chuck grabs my arm and pulls me off the ground, after a couple minutes of walking, as I finish the story about the movie, we start running again. We finish another hour of running, then I pull my bloody gloves off to check the damage, then I pull down my bloody tights to see how bad the knees are. Who knew that the dirt feels like concrete when it’s 28 degrees outside.

So now I have to think was the doctor telling me to slow down my first offer of help, then his telling me not to race, the second offer, and now the falling down, my third and last chance to get it through my thick head, that I have to take some time off.
Or
Is the moral to the story, don’t tell Chuck about horse movies, because he hates horse movies.
You decide!
January 15, 2012
Squeal, Grind, Screech
No its not a visit to the dentist. It's ROCK Racing on a training ride. My brakes have been screeching and squealing for too long now. I've got to do something about it before I stop getting invited to group rides. So here goes, a brake change with some new Brake Authority pads. They have a few different models that change pad material depending on the kind of riding you do. I picked the Burly which is recommended for XC and Enduro.
The UPS guy delivered the box of pads only like two days after I ordered them. Amazing. Brake Authority must have boxed them up the very second my order went in.

My Superfly 100 brakes are Avid Elixir R hydraulic front and rear. They are a big step up from the old cable operated brakes I had on my Gary Fisher Cake. I used to think they were as good as you could get. But that was before I tried Shimano hydraulic brakes. The SLX and XTR models are awesome. Maybe these new pads will help the Elixirs perform more like Shimanos.

So to start on this brake job, remove the retainer clip from the wheel side of the caliper. (and yes, I am doing bike maintenance in the kitchen, but it's Ok my wife is gone for the weekend and she will never know :)

I used a needle nose pliers to pull it off. Just be careful, this clip is small and easy to break if you yank it with a big ol vise grip or pry it sideways with a screwdriver.

Next remove the threaded pad hanger pin with a 2.5mm hex key. I like to use these plastic body multi-key tools, easy to keep all the sizes together in one place.

The hanger pin is threaded under the head. Different than most bolts you see, its done this way so the pads are free to move around on the pin without getting in a bind.

I put the two pieces together while I worked, less chance of them getting bumped off somewhere and lost.

Now you can pull the old pads out of the caliper. Fingers work great for this.

So here is why I think my old pads were so noisy. There was plenty of pad material left but its been glazed, pitted, and cracked. I probably got them contaminated somewhere along the way causing them to go bad. Or maybe Trek uses low quality pads in their factory to save money.

Loosen the caliper mounting bolts, but don't remove them. When you re-assemble, the caliper has to be loose enough to allow the new pads to center over both sides of the rotor with enough free play to slip in the gap between the caliper piston and the rotor.

The new pads came with a replacement spring. It is cutout to fit right in between the new pads. Keep these brake surfaces clean! Don't want them ending up like my last set, I even avoided touching them with my fingers.
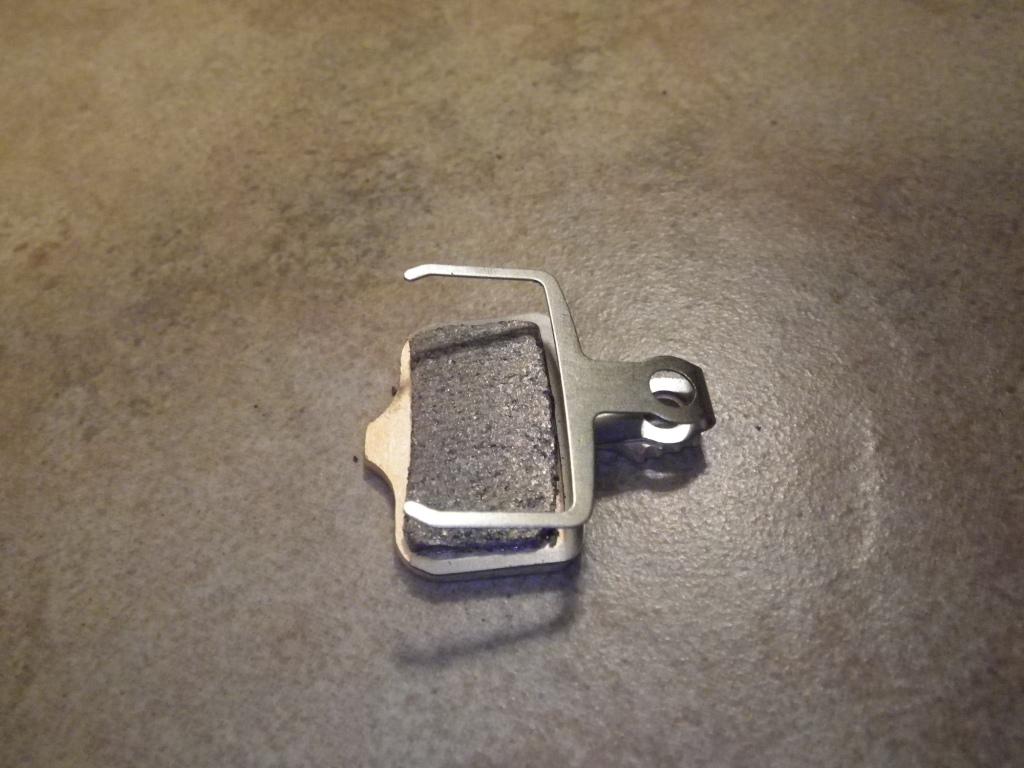
Make a little sandwich of the two pads with the spring in the middle. Put the new pad/spring stack in the caliper carefully sliding it over the rotor.

Put the pad hanger pin back in, and torque it with the 2.5mm hex key.

Re-install the retainer clip.

Use the 5mm hex key to torque down the caliper bolts. You want to tighten these while holding hand pressure on the brake handle, this will force everything into alignment as you torque them down. Give the wheel a spin and listen/feel for any rubbing. If you hear any rubbing, loosen the bolts, then do the torque while squeezing the brake handle again.

Done! Now its time to go for a ride. Watch for another post soon to review how the Brake Authority-Burly pads work out.

January 14, 2012
A Day on the GORC Trails

7 am on a Saturday morning in January, 18 degrees, virtually no wind, Good friends and fast bikes.
And me, I wasn't riding, I was just videographing, when I'm told not to run or ride for 6 weeks, that's what I do, ok, well, that's what I will do on Monday, I had to get one more weekend in first. Hey, you can't just go cold turkey without giving your mind time to digest something like this and get all the tears out too.
Oh, and I ran into my nemisis, Terry, while I was out there, good thing I was loading my bike or I would have had to kick his butt.

January 3, 2012
Matson Hill Run - New Technology
Got this new GPS toy for Christmas and tried it out on my Matson trail run a few days ago. Click the link below, then click 3D view. It takes the pictures I took while running the trail and matches them up with GPS coordinates. Then plays them in sort of a slide show as the cursor moves along the trail.
@trip - Matson Hill Run 1/2/2012
@trip - Matson Hill Run 1/2/2012
Subscribe to:
Posts (Atom)